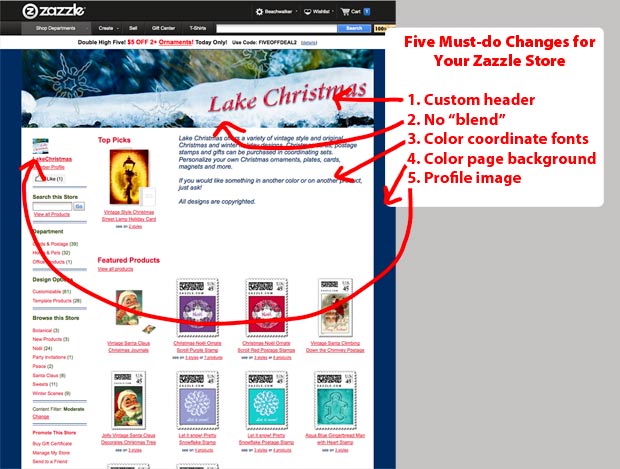
No coding required to polish your Zazzle custom store!
You don’t need to know any HTML or CSS to make five of the most important customizations for your Zazzle store.
Many successful sellers have done nothing beyond these changes to customize their stores, so don’t think a really fancy design is crucial to good sales. Just start with these five basic changes. These customizations will help make your site look more professional, showcase your designs AND lead to better sales opportunities!
Zazzle Custom Store Components
To create a Zazzle custom store, these are your essentials:
- 900px x 200px header with store name or other info uploaded to Zazzle
- 200px x 200px square profile image uploaded to Zazzle
- hexadecimal color numbers that coordinate with your header image (see post on Colorzilla for help with this)
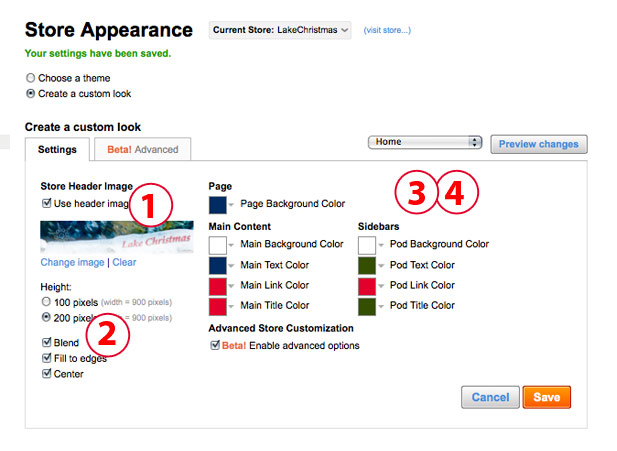
If you have these ready to go, it will take about five minutes to customize your store appearance! Go to your Manage My Store link and then Appearance to start your store transformation! [note: There’s a 5 minute video at the bottom of this page on Zazzle Custom Store Tips if you’d rather watch how to do this.]
1. Custom Header
Add a custom header, preferably with your store name and an indication of what’s in your store. You can feature one of your designs or products showcasing your designs. Or you can carry over your branding and colors from another site. No naked people, please, but your other designs should be fine. You can create this in Photoshop, Gimp, Illustrator, etc. Most people choose the 900 x 200px size jpg image. If you have uploaded your header to your Image folder, it’s easy to drop it in here.
You can change your header as many times as you like. Save and click on the blue visit store link to see if it turned out as you planned.
2. Check the Edge Blend
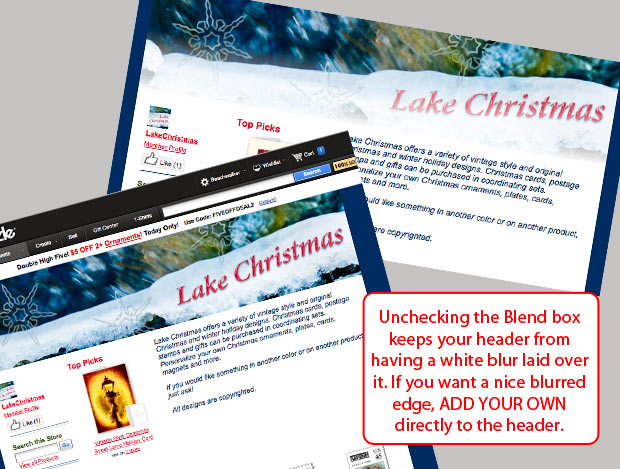
By default, Zazzle adds a white blend edge to the bottom of your header. If it works with your design, awesome! Chances are – it won’t! The soft edge can look very good, but the effect is better if you create it yourself on your header image before you upload it. You can then choose the color and amount of blend. You can also put your text over the blend. I saw another store yesterday where their attractive header design was ruined by not managing this edge! You can leave a hard edge or put any kind of border on the bottom in Photoshop if you prefer.
All you do is UNCHECK the box marked Blend! Please, do this. Your store usually looks lame if you leave it on.
3. Coordinate your storefront colors
You can control the text, link and title colors for your storefront and the sidebar (pod) as well as the store and pod background colors. The default colors when you’re in custom mode are fine, but your store will have a more harmonious or dynamic appearance if you coordinate the colors. Keep in mind that people are trained to think of links as blue, so if you have a shade of blue / turquoise / aqua, use that one for the links. A text font in medium gray to black, dark brown or another easily read color is good. You can choose to use your accent color on the titles.
Just be sure that there is good contrast between your link color and your main text. AND that all of your text is easily read against the background colors.
I usually leave the store background white. Why? Because I used to change it to very elegant shades of ecru and toast and aqua. Then Zazzle made changes to the backend and the backgrounds of all my products suddenly went white! Arrrgh! It eventually did get changed, but my store pages had an very unattractive patchwork quilt appearance! I had better things to do than fix that!
So, the simplest choice for your store background is white.
4. Choose a page background
Your page background is different than your store background. The store background is under your images, the page background is outside your storefront. Much of it is not actually visible, depending on the screen size a viewer has. The default color is actually fine, but why settle for fine when you can have coordinated?
Pick out a color which may or may not come from your header image and use that for your background. You can, of course, add a background image or pattern, but that will require you to break into the code. 🙂 A nice color is easy to add. Your options include:
- blend the page background with the store background color
- focus attention on your store with a black or other very dark color background
- drench your store with color
Don’t be afraid to experiment with all the text and background colors. Just be careful!. Red or royal blue on black is hard to read. Light purple is so abused, be careful with it.
5. Add a profile image
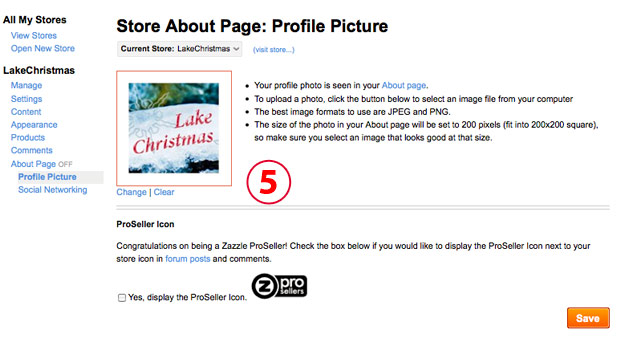
Adding a profile image is the final bit of polish for your initial store customization! In Manage my store, go to the About Page section. Click on Profile Picture and upload your photo. It’s going to drop into a square space and you won’t be able to crop it, so the recommended 200x200px size is perfect.
Your profile image, or avatar, can be a
- photograph of you, your kid or your pet. Head and shoulders, or just a head shot is good. No one says it has to be current.
- illustration of you, your kid or your pet.
- logo or other design that fits with the store.
Please, don’t use Mickey Mouse or Felix the Cat. They aren’t yours to use. This is YOUR store, have the profile image indicate something about YOU and/or YOUR STORE.
Ok, done yelling! It’s nuts to see avatars that don’t belong to people on their stores and doesn’t show anything about their work except they know how to copy!
Want more help?
If you would like a store designed for you, contact me and I’ll be happy to create a custom design using your own images or products. If you want to discuss your Zazzle store – its design, content, marketing – you can always ask on the forums. Or you can contact me for some individual coaching over Skype or via messaging.


